I received yesterday the Matter and Form 3D scanner and gave it a spin.
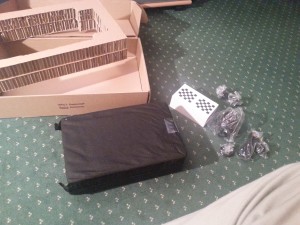
The box contains the scanner, one power cord with various plugs adapters, one usb cable, the calibration box, made of plastic with a checker pattern on it and a fabric bag to store the folded scanner which is just a bit bigger than an A4 sheet of paper.
The principle of the scan is a rotating plate on which you place your object to scan, the scanning head moves up and down and can shine two laser lines sequentially on the object. A high definition camera captures the image and sends it to your computer for processing by a dedicated matter and form software.
The installation is a breeze, you need to you plug the power cord and the usb cable to your computer, download the software from the matter and form website. It just ran smoothly for me, asked me if I wanted to do a firmware upgrade. I clicked Yes and it was done.
The software is very straightforward to use, you can scan, calibrate, or view previously scanned models. The windows version is available right now while the mac version is still in development.
http://smragan.com/2012/03/14/tactile-guitar-cues-applied-with-tape-embosser/ Calibrating.
I started by calibrating which initially failed for me! The plate of the scanner kept turning. It’s a known issue for people who are using windows in non-English country where the delimiter for fraction of number is a comma instead of dot (Pi is written 3.1415… in Canada, while it’s written 3,1415…in France)
I learned from the support website that you simply need to configure windows to use dot instead of comma in the control panel in the regional settings part. Once this was done, the calibration worked fine. I just clicked the calibrating button, placed the calibration box on the plate as instructed and left the scanner runs its calibration process automatically for a few minutes.
This small starting set-back got me worried: Is the scanner like one of those printer kit where you have to tinker most of the time? Thankfully no, this is the only issue I had with the scanner and since I changed my computer setting to dots instead of comma, it hasn’t given me any problem. I’m sure it will be soon fixed by a software update and will completely disappear from the user experience in the coming weeks.
buy ivermectin online uk Scanning.
The scanning process is very simple, you place your object on the plate and click the scan button, select between three scanning resolution and that’s it !
While there is an advanced panel for tweaking the scanning parameter, I choose to ignore it for now.
As the scanner software gets the data from your object, it makes the scanned point appear in a voxel like appearance on its interface, you can spin it around and zoom in or out. It’s the coolest progression bar I have ever seen. There is no time remaining indication though; my experience is that using the low resolution and fast option took 35 minutes for a 20 cm tall object. Scanning big objects in high resolutions can take up to several hours.
The program needs to be running on your computer, but you can do other tasks like browsing or using other software.
Once the scan is completed, you can hear the scanning head lowering itself back to the bottom and the program offers you to save your scan in the MFC format before cleaning it. There is a combine option for combining multiple scan, but I didn’t explore it yet.
You can select to crop points below a height you specify and crop point outside a cylinder which radius you specify, the interface is neat and you can see the point that would be deleted light up in red as you change the settings.
There is also an “Auto clean” button with two settings that runs an algorithm to removes inaccurate points. The default setting aren’t too aggressive, so I just clicked the button.
At first I missed an option to crop point above a specified height. But I realized that the Auto-clean button take care of those points.
You can export the model in the following format point clouds MFC, PTX, XYZ or as a SLT file, the SLT option is marked as beta but it worked pretty well for me.
The other two option that are currently greyed and not available are OBJ and colour mesh. They are marked as “Coming soon” in the interface.
At the moment, to get an OBJ file, you can use MeshLab to convert from the SLT but you won’t get the color information.
Examples.
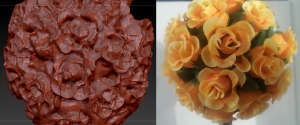
I’ve selected three objects for scanning. A normal little flower decoration with simple to scan features and smooth surfaces on the pot but intricate patterns on the fabric flowers, a moderately detailed anime figure in painted PVC and an insanely detailed little sculpey figure with a glittery surface.
Flower Pot.
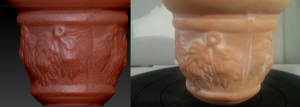
The surface of the flowerpot is made of Terracota and has a smooth surface with some details.
The stem is made of painted plastic and the flowers are made of thin fabric. The yellow flower are non-reflective fabric but the leaves are shiny and a bit reflective which probably confused the scanner a bit.
To be fair, the fabric of the flowers and leafs is way thinner than the specification of the scanner are supposed to be able to capture, still the result is quite nice. The only serious issue for this single scan is on the holes: the surface inside the pot was not captured and neither was the surface deep in the holes between the flowers, where leafs are, however part of the hole was captured up to half a centimeter deep but not down to its bottom.
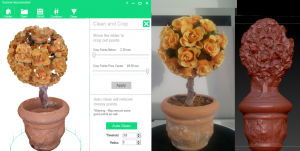
17 cm flower pot. On the left : Low resolution scan in the Matter and form interface
On the right : High resolution mesh exported
The base of the stem being not captured caused the reconstruction into a STL file to fail on this area and replace the stem with a silly trunk of polygons.
The capture of the color is dependent on the lighting of the room where you scan. It was a windy day with some clouds so the light in the room changed a lot as clouds passed in front of the sun during the scan and it shows on the color captured, sometimes the colors are dark, sometimes they are lighter. The solution to this is to scan in artificial light, or wait for a day where the sunlight will be steady for a hour or two.
Anime Figure
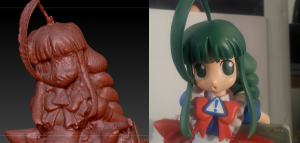
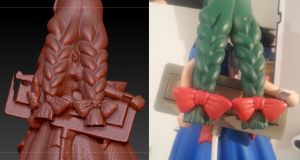
This is a 1/8th Japanese figure of Me-tan. The character has a moderate level of details with a dress, a frilly apron, some thin locks of hair and big ribbons, she is holding a giant CRL+ALT+SUPPR keyboard behind her back. The figure is made of painted PVC.
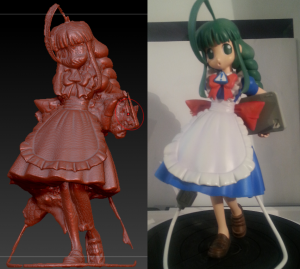
General view, the full USB cable is not completly made by the SLT exporter, however the scanner did pick those points
The low resolution scan failed to capture the lower part of her blue dress but the high resolution did succeed. Some of the gaps and holes were filled such as around her neck. A tiny hole mysteriously appeared on the keyboard. Similarly a tiny shrinkage appeared inside the top lock of hair. However details like the frills on the apron or the cuff were perfectly captured. The crease on the edge of the apron, even smaller than half a millimeter were captured accurately.
Sculpey figure
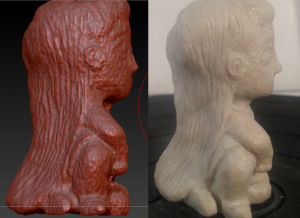
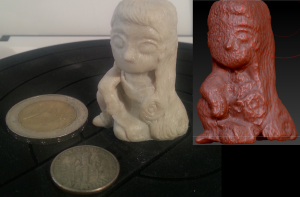
This is a personal sculpture based on Marietta Ren’s illustration “Petrole” It is 4 cm talls and made out of sculptey with glitter. The surface is highly detailed with intricate pattern in the hair and the ears. The glittery material is a little bit of a nightmare to scan with a laser as it shines and mess with the optics. This is a really hard object for any optic based scanner to capture, still the scan was not so bad and captured the general shape of the object and the pattern of the hair and the flower inside it, however details underneath the neck and arm or part of the details inside the 4mm tall ears were not captured. I didn’t try further, but I think that multiple scans with the object layout in various position (on the side, upside down, ect…) could improve the result. The surface of the scan looks uneven, this is because, like for the 2 other examples, I prevented the SLT exporter from smoothing it by setting its parameters to the max. Usually, the surface is way smoother.
Bottom Line : First impressions.
For the three above examples, I didn’t try to tweak the options, perform multiple scans or prepare the surface of the object, I just got the scanner out of the box, put the object on it and clicked to start the scan.
I’m convinced that better capture could be achieved with preparation, tweaking and more experience, still the result I got in those tests not only met but slightly exceeded my expectations. Especially compared to my first tries with other hand held laser line scanners, the process here is very simplified with a smooth experience and much more consistent results.
The software is not completely finished and I’m waiting for improvement on the SLT export and the native OBJ export with colors.
(But at the moment you can already get point cloud files with color information)
I’ll keep you updated but for now, after 10 hours using the scanner, I feel I had plenty of bang for my buck, and that’s pretty awesome.
I felt sad when I saw that you own a ME-tan figurine. It’s a very cute figurine that is unfortunately discontinued and quite rare…
Do you know of any similar-looking figurines?
Hi, thank your for your comment.
This figure was the only one in the Akihabara shop when I purchased it almost 10 years ago. According to myfigurecollection.net Ishizuka Gen (石塚 源)
You can find similar figurines by going to the OS-tan page on wikipedia to locate the japanese name of the character http://ja.wikipedia.org/wiki/OS%E3%81%9F%E3%82%93 and then copy paste the name in google image along with the word プラモデル (plastic model)